
Thursday, September 4, 2014
Monday, August 25, 2014
Sunday, August 24, 2014
Friday, August 22, 2014
More YouTube Views: 8 Simple Tips to Increase Your Video Traffic
In the past month, I’ve managed to increase my YouTube Views by over 26%. What does that mean? Well, simply put: more traffic. There is a DIRECT CORRELATION with the amount of views you get on your YouTube Videos, and the amount of incoming traffic you can receive from those views!
More Views means More Traffic!
How did I increase my views by 26% in one month? I dunno.
But here are the EIGHT most-important things I do to ALL of my YouTube Videos (new and old) each and every time I upload to make sure I’m getting the most out of my effort!
VIDEO: How to Boost Your YouTube Views
#1: Your Titles Are Worth Their Weight in Gold

What is your video about? If you have ANY video titled “About Us” or “My First Video” or WORSE: ”Mov00001.mp4″ You’re NOT doing yourself any favors. Take the time to choose the correct KEYWORD PHRASE and add it to your title. Make sure it is a RELEVANT keyword that you know your audience is ACTUALLY searching for when they go to YouTube & Google.
And here’s the super-quick tutorial on how to change your Title & Description:
How to Change Your Title & Description:https://www.youtube.com/watch?v=YO-M8HdLuS8
How to Change Your Title & Description:https://www.youtube.com/watch?v=YO-M8HdLuS8
#2: Add a “James Wedmore-Approved” Description?
YouTube didn’t give you a video description box so you could leave it empty. Here are the three most-essential elements you need in your description for every video (past and present!)
a. Your Keyword Phrase (at the beginning of the description)
b. Your URL (where do you want to send your viewers)
c. A “Mini-Blog Post” describing the contents of your video
And that’s it! Make sure every video has this for proper optimization! Oh ya, and here’s the tutorial for setting that up:
#3: Upload/Sync Your Transcript
Here’s something to think about: Google “listens” to your video before a single person ever sees it!
What?
Google has become very good at indexing your video, figuring out what your video is about, by listening to what you are saying in your video.
You may have seen my example before where I actually said, “I’m passionate about kettlebells” in one of my videos and ended up getting ranked for that phrase – even though I never used those words anywhere else in my Video SEO efforts.
You can capitalize on this by creating and uploading a full transcript of your video.
Upload a Transcript:
https://www.youtube.com/watch?v=_GRyQRzZJTw
Upload a Transcript:
https://www.youtube.com/watch?v=_GRyQRzZJTw
#4: Add Your Custom Thumbnail
Grab the attention of folks as they scan through the YouTube search results with a great thumbnail!
Choosing the right picture and adding some text can create a response just like a great magazine cover. You can literally stop viewers in their tracks and encourage them to choose your video over your competitors, boost YouTube views, and increase your customer engagement, just by choosing the right picture for your thumbnail. Here’s how to do this quickly and easily…
Upload Your Custom Thumbnail:
https://www.youtube.com/watch?v=tdTMy4k6N98
Upload Your Custom Thumbnail:
https://www.youtube.com/watch?v=tdTMy4k6N98
Tip #5: Add The Subscribe Annotation
YouTube likes channels that post regularly and have more subscribers…plain and simple. I get more views because I have more subscribers. Here is one super simple way to get more subscribers: ask! On every video, take 30 seconds and add a Subscribe Annotation that asks your viewers to become subscribers. To learn how to do this EXACTLY how I do it, watch the tutorial below…
Add a Subscribe Annotation:
https://www.youtube.com/watch?v=xpRH1B0SiH8
Add a Subscribe Annotation:
https://www.youtube.com/watch?v=xpRH1B0SiH8
Tip #6: Add Your External Link Annotation

YouTube is a Traffic Source. If done properly, you can see +30% of your viewers transfer into REAL targeted traffic to your website or blog! One of the BEST ways to boost this conversion number is to add an external link annotation to each of your videos. When you give your Call to Action, simply add an annotation that people can click on so they can hop on over to YOUR website and get the heck off of YouTube! For the Full tutorial, see below…
External Link Annotation:
https://www.youtube.com/watch?v=iL45d3MigxY
Tip #7: Add Your Subscribe Watermark
I love this one. Using a super-cool function called InVideo Programming, you can add a branded watermark to all of your videos with a click of a button. Now when users click on this watermark, they can subscribe to your channel or watch your latest video with ease! This is a great future…use it! Seriously…it takes 15 seconds to set up! Don’t believe me? Watch the tutorial here…
InVideo Programming Tutorial:
https://www.youtube.com/watch?v=YptMrf-uyr0
InVideo Programming Tutorial:
https://www.youtube.com/watch?v=YptMrf-uyr0
Tip #8: Using Your Blog to Boost YouTube Views
Your blog is the central hub of your online business.
While there are many platforms to build your business (YouTube being one of the more popular ones for building your social media authority), you don’t own many of those platforms. This isn’t a problem because you want to LEVERAGE their reach and authority.
However, you also want to OWN your main hub because you have more control over it. Sites like YouTube, Facebook, and Twitter can (and do) change their rules all of the time. Mostly for better because they want to keep people come back to their site.
However, building up your own property, your blog, and embedding your videos on that site, allows you to have more tools to serve your customers, build your list, and build your business.
They are not working against each other…they work together. That’s why you should include a backlink in each of your blogposts pointing back to the URL of your YouTube video.
How to Embed a YouTube Video on Your Website:
https://www.youtube.com/watch?v=mPBDO8qm7zM
How to Embed a YouTube Video on Your Website:
https://www.youtube.com/watch?v=mPBDO8qm7zM
“Do I have to Do All of These Things?”
NO! You Don’t…but someone on your team does!! Why would you ever spend the time and money to make a YouTube video, and fall short of doing the actual marketing and optimization that it REALLY takes to go the distance! Don’t let your video efforts be in vain. These 8 steps can be done in minutes…seriously! And the best part, you can do them on all past, present AND future videos!
Sunday, July 20, 2014
How to Network Unlock Your Samsung Galaxy S3 to Use with Another GSM Carrier
How to Network Unlock Your Samsung Galaxy S3 to Use with Another GSM Carrier
Why unlock your Samsung Galaxy S3 to use with a different SIM card? One possible reason is that you love your phone, but not your cellular provider because of the poor service or an unreliable connection. If you purchased a Samsung GS3 with AT&T, T-Mobile, etc. on a contract, it might be locked for a specific amount of time called the contract period.
After the contract period, you may request your network provider to unlock your phone, but it's not as easy to unlock as you think. In the U.S., unlocking became illegal after January 26th, 2013. However, a new bill is in progress to make it legal again.

How to Carrier Unlock Your Samsung Galaxy S3 Easily
Here's the step-by-step guide to show you how to quickly unlock your Galaxy S3, any model. If you have a newer Samsung Galaxy S4, check out these step-by-step instructions for SIM unlocking it.Warning
Before start unlocking, make sure you have properly backed up your device. It's risky if you don't properly use the instructions or follow the steps one by one, so it's not my responsibility if something happens.Step 1: Check Your Phone Version
Your phone must be running on Android 4.1.1 or later to successfully use this method. Check your device Android version by opening the Settings menu, scroll to the bottom, and select "About Device" and check your phone's "Android version" number.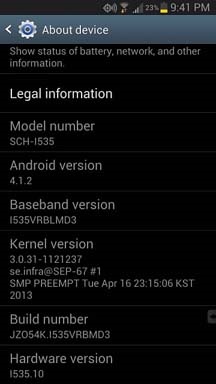
Step 2: Update Your Phone Version
If your phone is not updated to Android 4.1.1 or higher, you can do it by selecting the next menu to "About Device," select "System Updates," and then click on "Check for Updates." Your phone will automatically looked for the update over the network.Step 3: Dial the Secret Code
Open the dialer of your phone and enter the secret code *#197328640#—it will open the Service Mode Menu.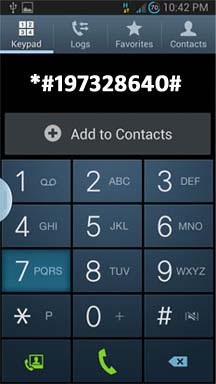
Step 4: Select UMTS Menu
In the Service Mode Menu, select [1] UMTS. Tap the menu selection on you phone's screen to select it. If you select the wrong option by mistake, press the MENU button of your device and select back.
Step 5: Open the Debug Screen
In the menu under UMTS, select the [1] DEBUG SCREEN.
Step 6: Select Phone Control
In the Debug Screen, select [8] PHONE CONTROL.Step 7: Select Network Lock
In the Phone Control Menu Screen, select [6] NETWORK LOCK.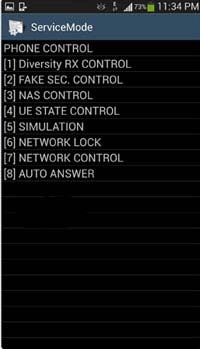
Step 8: Select Perso SHA256 Off
In the Network Lock Screen, select [3] PERSO SHA256 OFF and wait for 30 seconds. Then press the Menu button and select back.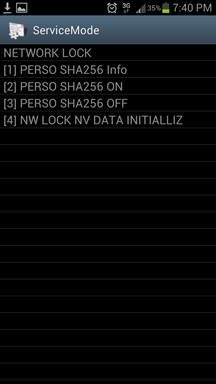
Step 9: Choose NW Lock NV Data INITIALLIZ
After going to back to main menu, select [4] NW Lock NV Data INITIALLIZ.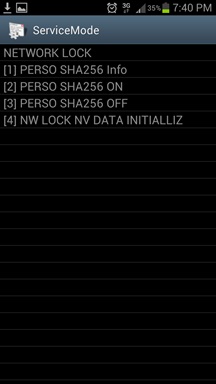
Step 10: Backup & Reboot Phone
Once you select NW Lock NV Data INITIALLIZ, kindly wait for almost one minute and then reboot your phone. Note you didn't receive any confirmation for the process.Insert the New SIM Card
Insert the non-accepted SIM Card and power on the Phone. If your phone didn't ask for Unlock Code, it's permanently unlocked to use with any GSM carrier.You may have to downgrade your firmware version in order to let this method work. alternatively you can call your service provider and ask them for SIM unlock code without paying from your wallet. The only catch is that each service provider has few criteria which must be met before they give the unlock code for your device.
If you do not meet the criteria required by your service provider, a third-party SIM unlock service for your Galaxy S3 is your only other option. Please note sometimes your device may need hard reset to perform unlocking.
Friday, July 18, 2014
How To Edit Modify Android Apps .Apk Full Solution
hello everyone... I want to share the tool for editing apk, and making a slightly guide for decompile/recompile apk and basic editing xml/smali... and this guide and tool for Windows user...
REQUIREMENTS :
Download and Install on your computer
1. JDK here
2. 7zip here or Winrar (recommended) here
3. Notepad++ here
4. Android SDK for patch 9.png until Zipalign the apk here
5. Apktool & baksmali/smali + Signer for all GB/ICS/JB ROM here
6. Apktool & baksmali/smali + Signer for all GB/ICS/JB ROM v2 here
7. Apktool & baksmali/smali + Signer for all GB/ICS/JB/KK ROM v3 (4.4 Kitkat support/optimized) here
Save or extract apktool to folder directory :
Windows XP : C:\Document and Settings\folder your computer name\here
Windows 7 : C:\User\folder your computer name\here
CREDITS & BIG THANKS TO :
- Brut.all for apktool
- Team Reject for Quick baksmali/smali file
- Yorzua for Sign apk file
- Rizal Lovins for support me
- pantrif13
- Copy *.jar file to apktool folder (make sure is the same folder). for example : android.policy.jar
- Open android.policy.jar using Winrar or 7zip and extract classes.dex file
- Drag & drop classes.dex to Quick-Baksmali.cmd (decompile process)
- wait and you will see a folder with the name "classout"
- now you can start editing smali file on classout folder (use Notepad++ for editing it)
- After editing is complete, Drag & drop classout folder to Quick-Smali.cmd (recompile process)
- After recompile is complete, there will be a file with a name "new-classes.dex"
- Open android.policy.jar using Winrar or 7zip
- Rename new-classes.dex to classes.dex, and Drag & drop to android.policy.jar with normal compression
- finally, push back android.policy.jar into the system your device. push manual using root explorer/similar application or make a flashable zip.
a. Copy framework-res.apk to apktool folder (make sure is the same folder).
b. Copy other *.apk you want to edit to apktool folder. for example : GreenRockers.apk
c. Open Command Prompt.bat
d. Decompile and install framework
if your apk is Contacs.apk, Phone.apk, Camera.apk etc.. follow this guide :
e. wait and you will see a folder with the name "GreenRockers or Settings"
f. now you can start editing png, xml, even smali file
g. After editing is complete, Now Recompile
or
h. After recompile is complete, go to GreenRockers or Settings folder, Open dist folder and open GreenRockers.apk or Settings.apk using Winrar/7zip
i. Open Original GreenRockers.apk or Settings.apk Using Winrar/7zip
j. Drag & drop META-INF folder and android.manifest.xml (if you not edit android.manifest.xml), also lib folder if there in Original GreenRockers.apk to Modified GreenRockers.apk or Modified Settings.apk on dist folder.
k. Now Sign apk, example :
l. Rename GreenRockers_signed.apk to GreenRockers.apk
m. Zipalign the apk
n. Rename GreenRockers-new.apk to GreenRockers.apk
o. finally, push back xxxxxx.apk into the system your device. push manual using root explorer/similar application or make a flashable zip.
1. Download and Install Android SDK (if you've downloaded, do not need to download again)
2. Go to C:\Program Files\Android\android-sdk\tools
3. Search + copy zipalign.exe and draw9patch.bat then paste in the c:\windows\here
4. Open cmd and typing this code (For example : Zipalign SystemUI.apk) :
REQUIREMENTS :
Download and Install on your computer
1. JDK here
2. 7zip here or Winrar (recommended) here
3. Notepad++ here
4. Android SDK for patch 9.png until Zipalign the apk here
5. Apktool & baksmali/smali + Signer for all GB/ICS/JB ROM here
6. Apktool & baksmali/smali + Signer for all GB/ICS/JB ROM v2 here
7. Apktool & baksmali/smali + Signer for all GB/ICS/JB/KK ROM v3 (4.4 Kitkat support/optimized) here
Save or extract apktool to folder directory :
Windows XP : C:\Document and Settings\folder your computer name\here
Windows 7 : C:\User\folder your computer name\here
CREDITS & BIG THANKS TO :
- Brut.all for apktool
- Team Reject for Quick baksmali/smali file
- Yorzua for Sign apk file
- Rizal Lovins for support me
- pantrif13
1. How to Decompile and Recompile *.jar file or classes.dex
- Copy *.jar file to apktool folder (make sure is the same folder). for example : android.policy.jar
- Open android.policy.jar using Winrar or 7zip and extract classes.dex file
- Drag & drop classes.dex to Quick-Baksmali.cmd (decompile process)
Screenshot example for Baksmaling/decompile classes.dex using drag & drop method :

- wait and you will see a folder with the name "classout"
- now you can start editing smali file on classout folder (use Notepad++ for editing it)
- After editing is complete, Drag & drop classout folder to Quick-Smali.cmd (recompile process)
Screenshot example for Smaling/recompile classout folder using drag & drop method :

- After recompile is complete, there will be a file with a name "new-classes.dex"
- Open android.policy.jar using Winrar or 7zip
- Rename new-classes.dex to classes.dex, and Drag & drop to android.policy.jar with normal compression
- finally, push back android.policy.jar into the system your device. push manual using root explorer/similar application or make a flashable zip.
2. How to Decompile and Recompile *.apk file
a. Copy framework-res.apk to apktool folder (make sure is the same folder).
(Attention : to edit other default apk on system/app like Contacts.apk, Phone.apk. MusicPlayer.apk etc.. needed framework 2.for example : twframework-res.apk)
b. Copy other *.apk you want to edit to apktool folder. for example : GreenRockers.apk
c. Open Command Prompt.bat
d. Decompile and install framework
Code:
apktool if framework-res.apk
apktool d GreenRockers.apk
Screenshot example for installing framework and decompiling apk :

if your apk is Contacs.apk, Phone.apk, Camera.apk etc.. follow this guide :
Code:
apktool if framework-res.apk
apktool if twframework-res.apk
apktool d Settings.apk
Screenshot example for installing framework 2 and decompiling apk :

e. wait and you will see a folder with the name "GreenRockers or Settings"
f. now you can start editing png, xml, even smali file
g. After editing is complete, Now Recompile
Code:
apktool b -f -d GreenRockers
Code:
apktool b -f -d Settings
Screenshot example for decompiling dan recompiling apk :

h. After recompile is complete, go to GreenRockers or Settings folder, Open dist folder and open GreenRockers.apk or Settings.apk using Winrar/7zip
i. Open Original GreenRockers.apk or Settings.apk Using Winrar/7zip
j. Drag & drop META-INF folder and android.manifest.xml (if you not edit android.manifest.xml), also lib folder if there in Original GreenRockers.apk to Modified GreenRockers.apk or Modified Settings.apk on dist folder.
Screenshot example for Drag & drop META-INF folder etc :

k. Now Sign apk, example :
Code:
java -jar SignApk.jar testkey.x509.pem testkey.pk8 GreenRockers.apk GreenRockers_signed.apk
(Attention : Sign apk is only for 3rd Party apps, you can sign apk from system/app. but not all apk on system/app support)
l. Rename GreenRockers_signed.apk to GreenRockers.apk
m. Zipalign the apk
Code:
zipalign -fv 4 GreenRockers.apk GreenRockers-new.apk
o. finally, push back xxxxxx.apk into the system your device. push manual using root explorer/similar application or make a flashable zip.
3. How to Zipalign the *.apk
1. Download and Install Android SDK (if you've downloaded, do not need to download again)
2. Go to C:\Program Files\Android\android-sdk\tools
3. Search + copy zipalign.exe and draw9patch.bat then paste in the c:\windows\here
4. Open cmd and typing this code (For example : Zipalign SystemUI.apk) :
Code:
zipalign -fv 4 SystemUI.apk SystemUI-new.apk
Thursday, July 17, 2014
Saturday, July 12, 2014
Friday, May 23, 2014
List of Android "Secret" Codes, Tips, and Tricks
As pointed out from comments these are mostly for Samsung, I have added some for HTC below. Like I said this is just a start we can build form it. If anyone would like to create a Google Doc from this information please feel free I will add a link to this post.
As pointed out from comments these are mostly for Samsung, I have added some for HTC below. Like I said this is just a start we can build form it. If anyone would like to create a Google Doc from this information please feel free I will add a link to this post.
SAMSUNG CODES
| Code | Description |
|---|---|
| *#*#4636#*#* | Display information about Phone, Battery and Usage statistics |
| *#*#7780#*#* | Restting your phone to factory state-Only deletes application data and applications |
| *2767*3855# | It's a complete wiping of your mobile also it reinstalls the phones firmware |
| *#*#34971539#*#* | Shows completes information about the camera |
| *#*#7594#*#* | Changing the power button behavior-Enables direct poweroff once the code enabled |
| *#*#273283*255*663282*#*#* | For a quick backup to all your media files |
| *#*#197328640#*#* | Enabling test mode for service activity |
| *#*#232339#*#* OR *#*#526#*#* | Wireless Lan Tests |
| *#*#232338#*#* | Displays Wi-Fi Mac-address |
| *#*#1472365#*#* | For a quick GPS test |
| *#*#1575#*#* | A Different type GPS test |
| *#*#0283#*#* | Packet Loopback test |
| *#*#0*#*#* | LCD display test |
| *#*#0673#*#* OR *#*#0289#*#* | Audio test |
| *#*#0842#*#* | Vibration and Backlight test |
| *#*#2663#*#* | Displays touch-screen version |
| *#*#2664#*#* | Touch-Screen test |
| *#*#0588#*#* | Proximity sensor test |
| *#*#3264#*#* | Ram version |
| *#*#232331#*#* | Bluetooth test |
| *#*#7262626#*#* | Field test |
| *#*#232337#*# | Displays bluetooth device address |
| *#*#8255#*#* | For Google Talk service monitoring |
| *#*#4986*2650468#*#* | PDA, Phone, Hardware, RF Call Date firmware info |
| *#*#1234#*#* | PDA and Phone firmware info |
| *#*#1111#*#* | FTA Software version |
| *#*#2222#*#* | FTA Hardware verion |
| *#*#44336#*#* | Displays Build time and change list number |
| *#06# | Displsys IMEI number |
| *#*#8351#*#* | Enables voice dialing logging mode |
| *#*#8350#*#* | Disables voice dialing logging mode |
| ##778 (+call) | Brings up Epst menu |
HTC CODES
| Code | Description |
|---|---|
| *#*#3424#*#* | HTC function test Program. |
| *#*#4636#*#* | HTC Info menu |
| *#*#8255#*#* | launching GTalk Service Monitor |
| ##3424# | Diagnostic mode. |
| ##3282# | for EPST. |
| ##8626337# | for VOCODER |
| ##33284# | Field trial menu. |
| ##786# | Reverse Logistics Support. |
| ##7738# | Protocol Revision. |
| ##775# | Unknown |
| ##2539# | Unknown |
| Code | Description |
|---|---|
| *#1234# | to check software version of phone. |
| *#12580*369# | to check software and hardware information. |
| *#0228# | Battery status (ADC, RSSI reading) |
| *#0011# | Service Menu |
| *#0283# | loopback test |
| *#06# | imei |
| *#03# | nandflashheaderread |
| *#0808# | usb service |
| *#9090# | service mode |
| *#7284# | FactoryKeystring |
| *#34971539# | camera firmware standard |
| *#1111# | servicemode |
| *#0*# | Testmodus |
Code Description *#*#4636#*#* Display information about Phone, Battery and Usage statistics *#*#7780#*#* Resetting your phone to factory state-Only deletes application data and applications *2767*3855# It's a complete wiping of your mobile also it reinstalls the phones firmware *#*#34971539#*#* Shows completes information about the camera *#*#7594#*#* Changing the power button behavior-Enables direct poweroff once the code enabled *#*#273283*255*663282*#*#* For a quick backup to all your media files *#*#197328640#*#* Enabling test mode for service activity *#*#232339#*#* OR *#*#526#*#* Wireless Lan Tests *#*#232338#*#* Displays Wi-Fi Mac-address *#*#1472365#*#* For a quick GPS test *#*#1575#*#* A Different type GPS test *#*#0283#*#* Packet Loopback test *#*#0*#*#* LCD display test *#*#0673#*#* OR *#*#0289#*#* Audio test *#*#0842#*#* Vibration and Backlight test *#*#2663#*#* Displays touch-screen version *#*#2664#*#* Touch-Screen test *#*#0588#*#* Proximity sensor test *#*#3264#*#* Ram version *#*#232331#*#* Bluetooth test *#*#7262626#*#* Field test *#*#232337#*#* Displays bluetooth device address *#*#8255#*#* For Google Talk service monitoring *#*#4986*2650468#*#* PDA, Phone, Hardware, RF Call Date firmware info *#*#1234#*#* PDA and Phone firmware info *#*#1111#*#* FTA Software version *#*#2222#*#* FTA Hardware verion *#*#44336#*#* Displays Build time and change list number *#06# Displsys IMEI number *#*#8351#*#* Enables voice dialing logging mode *#*#8350#*#* Disables voice dialing logging mode
There, I fixed it
Wednesday, May 21, 2014
IGNOU Hall Ticket Dec. 2015 Download here
IGNOU Hall Ticket Dec. 2015
IGNOU Hall Ticket June 2014 – Download or Check out now IGNOU Hall Ticket of all Courses. Here you will able to see all of your Courses Hall Ticket at one place so please check out by below link and get print out o this Ticket for upcoming Examination.
How I Download my Hall Ticket:
After opening below link please enter your 9(nine) digit number in box and select your subject and click on submit so you get your Hall Ticket and save in your Computer or get print from cyber café or your own printer.
Included Courses in Hall Ticket: MBA, MCA, MSW, MTECH, M.Com, Med, B.Com, BBA, BCA, B.Ed, BSW, DELED, PGDID, PhD and all Master Degree, Bachelor Degree, Diploma, Certificate, Post Graduate Diploma, Post Graduate Certificate, PhD Doctoral Courses and more courses included in this section.
Please leave your comment for any doubt or query with your Hall Ticket of June 2014 session Exam.
Ignou TEE Hall Ticket June 2014 - You will download here Term-End Examination held in June 2014 online. You can download here BA, B.Ed, BPP, BDP, B.Com, B.Tech etc. hall ticket online through entering their Nine Digit Enrolment Number.The Term End Examination for June, 2014 of Indira Gandhi National Open University (Ignou) is going to commence from 2nd June, 2014 and will conclude on 28th June, 2014.
The University has established 781 examination centers including 41 overseas centers and 56 centers in Jail for jail inmates. Hall Ticket (Examination Intimation Slips) will be issue to 4,48,320 eligible students who had applied for appearing in the Term End Examination.
The University has established 781 examination centers including 41 overseas centers and 56 centers in Jail for jail inmates. Hall Ticket (Examination Intimation Slips) will be issue to 4,48,320 eligible students who had applied for appearing in the Term End Examination.
.jpg)


Ignou TEE Date Sheet June 2014 - You will find here Indira Gandhi National Open University (Ignou) Term-End Examination (TEE) Bachelor's, Master's, Diploma & Certificate Date Sheet/Time Table for examination June, 2014 online.
In this section you will find here Date Sheet/Time Table of Ignou BA, B.Sc, B.Com, BDP, B.Ed, B.Tech, MA, M.Sc, M.Com, M.Ed etc. program Term End Examination June 2014.
The Term End Examination for June, 2014 of Ignou is going to commence from 2nd June, 2014 and will conclude on 28th June, 2014.
Permission for appearing in the examination is provisional and is subject to the following conditions:

- Your registration for these courses is valid and not time barred.
- You have submitted the required number of assignments in the courses by due date wherever applicable
- You have completed the minimum time to pursue these courses as per the provision of your programme
- You have paid the examination fee for all the courses you are appearing in the examination
Saturday, May 3, 2014
How To Edit APK file Android ApplicationFull tutorial HD
How To Edit APK file Android ApplicationFull tutorial HD
Apk Edit - Edit Your Apk File (Android App)
You want to edit apk file(android app) directly without the need of eclipse or command line build utility? Yes You can do it using APK Edit Utility.
Steps
(1) Download APK Edit Software from here. http://www.4shared.com/zip/wTKZA1uz/APK_Edit.html
(2) Open and browse the apk file you want to edit.
Steps
(1) Download APK Edit Software from here. http://www.4shared.com/zip/wTKZA1uz/APK_Edit.html
(2) Open and browse the apk file you want to edit.
(3) Wait for some time until the Browse link becomes clickable in Details Tab.

(4) Now, click on browse and folder structure will be opened.

(5) You can make small changes like string name change, image change, app name change & save the file to reflect the changes in apk file.

To Change icon or images :- Replace existing images with new images.
To make string changes :- find strings.xml file in res and change the string’s values.
To make app name, package name changes :- Change the android manifest file.
After making all changes, save the file and close the folder structure. Click On Ok and you will see the android app with all the changes you made.

(4) Now, click on browse and folder structure will be opened.

(5) You can make small changes like string name change, image change, app name change & save the file to reflect the changes in apk file.

To Change icon or images :- Replace existing images with new images.
To make string changes :- find strings.xml file in res and change the string’s values.
To make app name, package name changes :- Change the android manifest file.
After making all changes, save the file and close the folder structure. Click On Ok and you will see the android app with all the changes you made.
Subscribe to:
Posts
(
Atom
)


.jpg)