
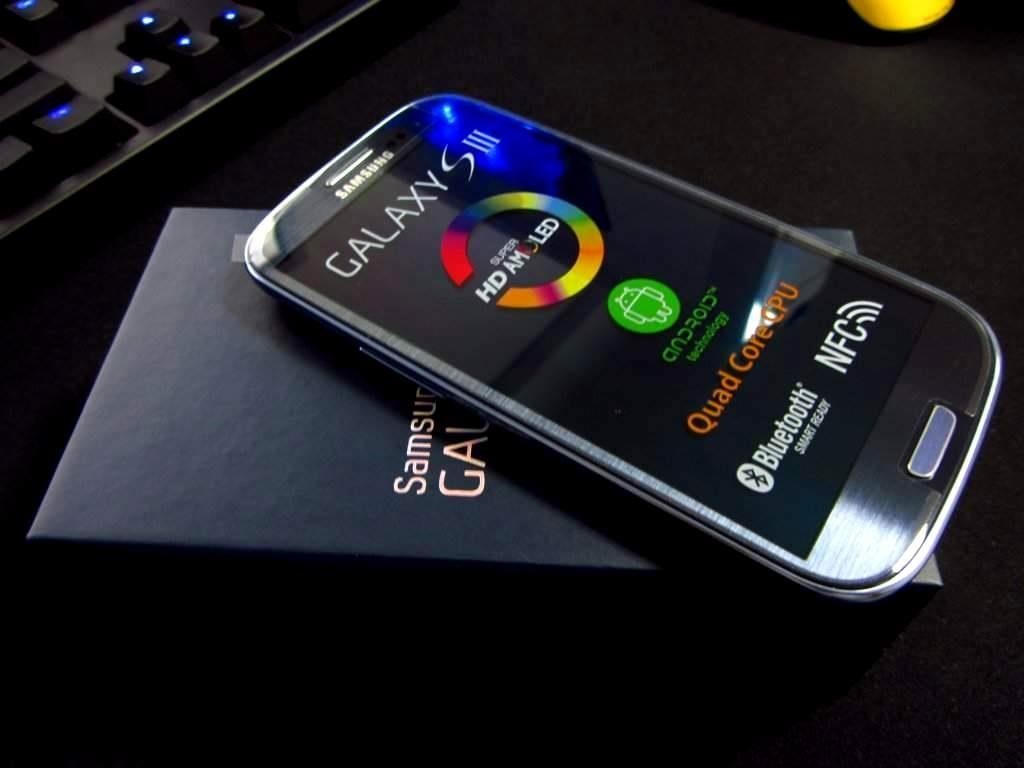
How to Network Unlock Your Samsung Galaxy S3 to Use with Another GSM Carrier
Why unlock your Samsung Galaxy S3 to use with a different SIM card? One possible reason is that you love your phone, but not your cellular provider because of the poor service or an unreliable connection. If you purchased a Samsung GS3 with AT&T, T-Mobile, etc. on a contract, it might be locked for a specific amount of time called the contract period.
After the contract period, you may request your network provider to unlock your phone, but it's not as easy to unlock as you think. In the U.S., unlocking became illegal after January 26th, 2013. However, a new bill is in progress to make it legal again.
How to Carrier Unlock Your Samsung Galaxy S3 Easily
Here's the step-by-step guide to show you how to quickly unlock your Galaxy S3, any model. If you have a newer Samsung Galaxy S4, check out these step-by-step instructions for SIM unlocking it.Warning
Before start unlocking, make sure you have properly backed up your device. It's risky if you don't properly use the instructions or follow the steps one by one, so it's not my responsibility if something happens.Step 1: Check Your Phone Version
Your phone must be running on Android 4.1.1 or later to successfully use this method. Check your device Android version by opening the Settings menu, scroll to the bottom, and select "About Device" and check your phone's "Android version" number.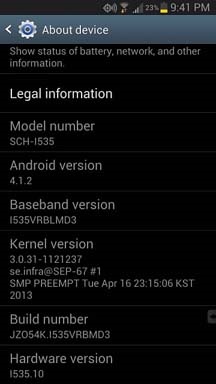
Step 2: Update Your Phone Version
If your phone is not updated to Android 4.1.1 or higher, you can do it by selecting the next menu to "About Device," select "System Updates," and then click on "Check for Updates." Your phone will automatically looked for the update over the network.Step 3: Dial the Secret Code
Open the dialer of your phone and enter the secret code *#197328640#—it will open the Service Mode Menu.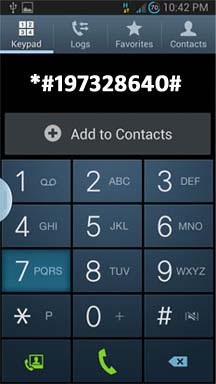
Step 4: Select UMTS Menu
In the Service Mode Menu, select [1] UMTS. Tap the menu selection on you phone's screen to select it. If you select the wrong option by mistake, press the MENU button of your device and select back.
Step 5: Open the Debug Screen
In the menu under UMTS, select the [1] DEBUG SCREEN.
Step 6: Select Phone Control
In the Debug Screen, select [8] PHONE CONTROL.Step 7: Select Network Lock
In the Phone Control Menu Screen, select [6] NETWORK LOCK.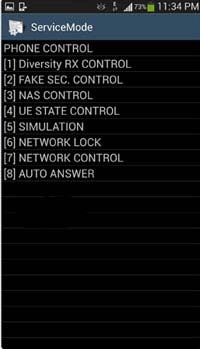
Step 8: Select Perso SHA256 Off
In the Network Lock Screen, select [3] PERSO SHA256 OFF and wait for 30 seconds. Then press the Menu button and select back.
Step 9: Choose NW Lock NV Data INITIALLIZ
After going to back to main menu, select [4] NW Lock NV Data INITIALLIZ.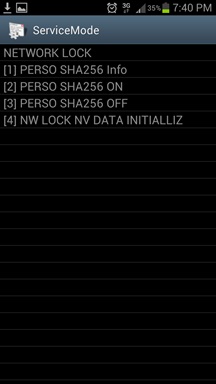
Step 10: Backup & Reboot Phone
Once you select NW Lock NV Data INITIALLIZ, kindly wait for almost one minute and then reboot your phone. Note you didn't receive any confirmation for the process.Insert the New SIM Card
Insert the non-accepted SIM Card and power on the Phone. If your phone didn't ask for Unlock Code, it's permanently unlocked to use with any GSM carrier.You may have to downgrade your firmware version in order to let this method work. alternatively you can call your service provider and ask them for SIM unlock code without paying from your wallet. The only catch is that each service provider has few criteria which must be met before they give the unlock code for your device.
If you do not meet the criteria required by your service provider, a third-party SIM unlock service for your Galaxy S3 is your only other option. Please note sometimes your device may need hard reset to perform unlocking.


