
Over the years, I’ve seen many different navigation pattern
implementations in Android. Some of the apps were using only Activities,
while others Activities mixed with Fragments and/or with Custom Views.
One of my favorite navigation pattern implementations is based on the “One-Activity-Multiple-Fragments” philosophy, or simply the Fragment Navigation Pattern, where every screen in the application is a full screen Fragment and all or most of these fragments are contained in one Activity.
This approach not only simplifies how the navigation is implemented, but it has much better performance and consequently offers a better user experience.

In this article we will look at some common navigation pattern implementations in Android, and then introduce the Fragment based navigation pattern, comparing and contrasting with the others. A demo application implementing this pattern has been uploaded to GitHub.
A simple example is shown in the diagram below:

Activity A1 is the entry point in our application (for example, it represents a splash screen or a main menu) and from it the user can navigate to A2 or A3. When you need to communicate between activities you can use the startActivityForResult() or maybe you share a globally accessible business logic object between them.
When you need to add a new Activity you need to perform the following steps:
Fortunately we have tools for it called tasks and some guidelines for proper back stack navigation.
Then, with API level 11 came fragments…
How can A1 communicate with F1? Well A1 has total control over F1 since it created F1. A1 can pass a bundle, for example, on the creation of F1 or can invoke its public methods. How can F1 communicate with A1? Well this is more complicated, but it can be resolved with a callback/observer pattern where the A1 subscribes to F1 and F1 notifies A1.
But how can A1 and A2 communicate with each other? This has been covered already, for example via startActivityForResult().
And now the real question comes: how can F1 and F2 communicate with each other? Even in this case we can have a business logic component which is globally available, so it can be used to pass data. But this does not always lead to elegant design. What if F2 needs to pass some data to F1 in a more direct way? Well, with a callback pattern F2 can notify A2, then A2 finishes with a result and this result is captured by A1 which notifies F1.
This approach needs a lot of boilerplate code and quickly becomes a source of bugs, pain and anger.
What if we could get rid all of the activities and keep only one of them which keeps the rest of the fragments?
Let’s have a look at the following diagram:

Now we have only one container activity and we have multiple fragments which have again a tree like structure. The navigation between them is handled by the FragmentManager, it has its back stack.
Notice that now we don’t have the startActivityForResult() but we can implement a callback/observer pattern. Let’s see some pros and cons of this approach:
This could seem like a minor thing, but for larger applications which have 50+ activities this can significantly improve readability of the AndroidManifest.xml file.
Look at the manifest file of the example application which has several screens. The manifest file still remains super simple.
Let’s imagine a situation where we would like to start a screen where the user can select some items from a list of person. You also would like to pass some filtering arguments like age and occupation and gender.
In case of Activities, you would write:
Furthermore, wouldn’t it be nicer if the result (list of persons) would arrive in a form of _List_ and not in a serialized form which must be deserialized?
In case of fragment based navigation, everything is more straightforward. All you have to do is to write a method in the NavigationManager called startPersonSelectorFragment() with the necessary arguments and with a callback implementation.
In case of pure activity navigation, each page should inflate and initialize the drawer, which is of course expensive.
On the diagram below you can see several root fragments (FR*) which are the full screen fragments which can be accessed directly from the drawer, and also the drawer is only accessible when these fragments are displayed. Everything which is to the right of the dashed line in the diagram are there as an example of an arbitrary navigation scheme.
Since the container activity holds the drawer, we have only one drawer instance so at every navigation step where the drawer should be visible you don’t have to inflate and initialize it again. Still not convinced how all of these work? Take a look at my sample application which demonstrates drawer usage.
Indeed, I had to resolve problems with nested fragments, 3rd party libraries which also use fragments such as ShinobiControls, ViewPagers and FragmentStatePagerAdapters.
I must admit that gaining sufficient experience with fragments to be able to solve these problems was a rather long process. But in every case the issue was not that the philosophy is bad, but that I did not understand fragments well enough. Maybe if you understand fragments better than I did you would not even encounter these issues.
The only con that I can mention now is that we can still encounter problems which would not be trivial to solve since there is no mature library out there which showcase all the complex scenarios of a complex application with fragment based navigation.
In case you haven’t already, check out the demo application uploaded to GitHub implementing. Feel free to fork or contribute to it with nicer examples which would better show its usage.
One of my favorite navigation pattern implementations is based on the “One-Activity-Multiple-Fragments” philosophy, or simply the Fragment Navigation Pattern, where every screen in the application is a full screen Fragment and all or most of these fragments are contained in one Activity.
This approach not only simplifies how the navigation is implemented, but it has much better performance and consequently offers a better user experience.
In this article we will look at some common navigation pattern implementations in Android, and then introduce the Fragment based navigation pattern, comparing and contrasting with the others. A demo application implementing this pattern has been uploaded to GitHub.
World of Activities
A typical Android application which uses only activities is organized into a tree-like structure (more precisely into a directed graph) where the root activity is started by the launcher. As you navigate in the application there is an activity back stack maintained by the OS.A simple example is shown in the diagram below:
Activity A1 is the entry point in our application (for example, it represents a splash screen or a main menu) and from it the user can navigate to A2 or A3. When you need to communicate between activities you can use the startActivityForResult() or maybe you share a globally accessible business logic object between them.
When you need to add a new Activity you need to perform the following steps:
- Define the new activity
- Register it in the AndroidManifest.xml
- Open it with a startActivity() from another activity
Fortunately we have tools for it called tasks and some guidelines for proper back stack navigation.
Then, with API level 11 came fragments…
World of Fragments
“Android introduced fragments in Android 3.0 (API level 11), primarily to support more dynamic and flexible UI designs on large screens, such as tablets. Because a tablet’s screen is much larger than that of a handset, there’s more room to combine and interchange UI components. Fragments allow such designs without the need for you to manage complex changes to the view hierarchy. By dividing the layout of an activity into fragments, you become able to modify the activity’s appearance at runtime and preserve those changes in a back stack that’s managed by the activity.” – cited from the Google’s API guide for Fragments.This new toy allowed developers to build a multi-pane UI and reuse the components in other activities. Some developers love this while others don’t. It is a popular debate whether to use fragments or not, but I think everybody would agree that fragments brought in additional complexity and the developers really need to understand them in order to use them properly.
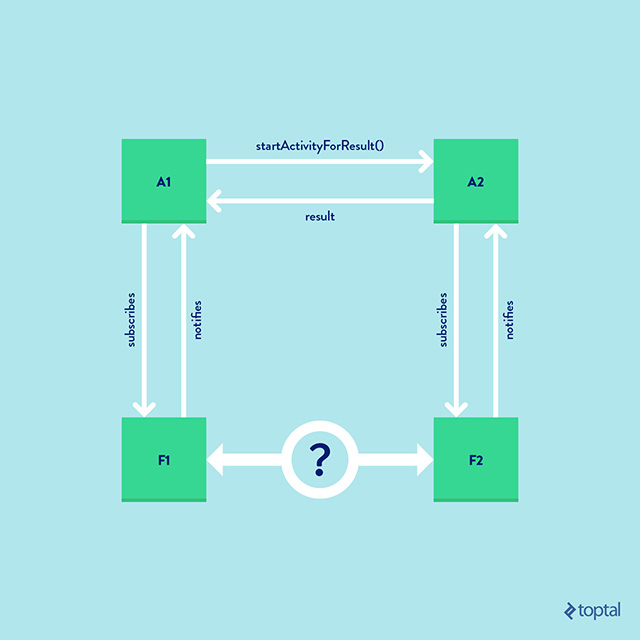
Fullscreen Fragment Nightmare in Android
I started to see more and more examples where the fragments were not just representing a part of the screen, but in fact the whole screen was a fragment contained in an activity. Once I even saw a design where every activity had exactly one full screen fragment and nothing more and the only reason why these activities existed was to host these fragments. Next to the obvious design flaw, there is another problem with this approach. Have a look at the diagram from below:How can A1 communicate with F1? Well A1 has total control over F1 since it created F1. A1 can pass a bundle, for example, on the creation of F1 or can invoke its public methods. How can F1 communicate with A1? Well this is more complicated, but it can be resolved with a callback/observer pattern where the A1 subscribes to F1 and F1 notifies A1.
But how can A1 and A2 communicate with each other? This has been covered already, for example via startActivityForResult().
And now the real question comes: how can F1 and F2 communicate with each other? Even in this case we can have a business logic component which is globally available, so it can be used to pass data. But this does not always lead to elegant design. What if F2 needs to pass some data to F1 in a more direct way? Well, with a callback pattern F2 can notify A2, then A2 finishes with a result and this result is captured by A1 which notifies F1.
This approach needs a lot of boilerplate code and quickly becomes a source of bugs, pain and anger.
What if we could get rid all of the activities and keep only one of them which keeps the rest of the fragments?
Fragment Navigation Pattern
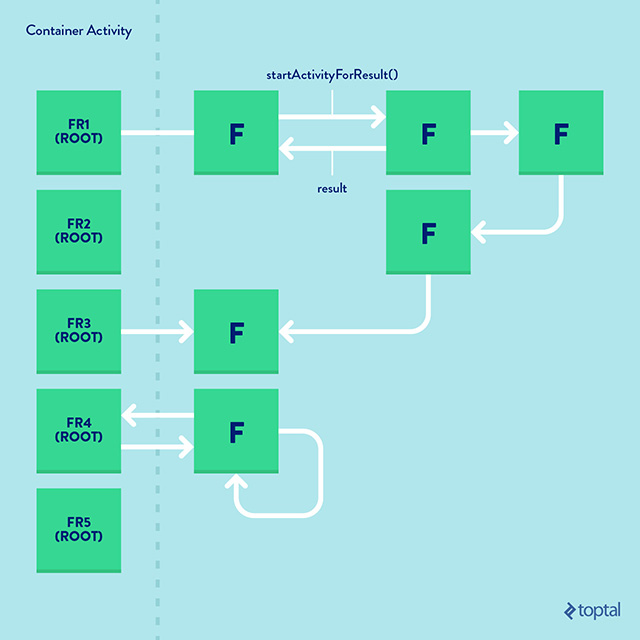
Over the years I started to use the “One-Activity-Multiple-Fragments” pattern in most of my applications and I still use it. There are a lot of discussions out there about this approach, for example here and here. What I missed however is a concrete example which I can see and test myself.Let’s have a look at the following diagram:
Now we have only one container activity and we have multiple fragments which have again a tree like structure. The navigation between them is handled by the FragmentManager, it has its back stack.
Notice that now we don’t have the startActivityForResult() but we can implement a callback/observer pattern. Let’s see some pros and cons of this approach:
Pros:
1. Cleaner and more maintainable AndroidManifest.xml
Now that we have only one Activity, we no longer need to update the manifest every time we add a new screen. Unlike activities, we do not have to declare fragments.This could seem like a minor thing, but for larger applications which have 50+ activities this can significantly improve readability of the AndroidManifest.xml file.
Look at the manifest file of the example application which has several screens. The manifest file still remains super simple.
<?xml version="1.0" encoding="utf-8"?>
   package="com.exarlabs.android.fragmentnavigationdemo.ui" >
   <application android:name= ".FragmentNavigationDemoApplication"
       android:allowBackup="true"
       android:icon="@mipmap/ic_launcher"
       android:label="@string/app_name"
       android:supportsRtl="true"
       android:theme="@style/AppTheme">
       <activity
           android:name="com.exarlabs.android.fragmentnavigationdemo.ui.MainActivity"
           android:label="@string/app_name"
           android:screenOrientation="portrait"
           android:theme="@style/AppTheme.NoActionBar" >
           <intent-filter>
               <action android:name="android.intent.action.MAIN" />
               <category android:name="android.intent.category.LAUNCHER" />
           </intent-filter>
       </activity>
   </application>
</manifest>
2. Centralized navigation management
In my code example, you will see that I use NavigationManager which in my case it is injected into every fragment. This manager can be used as a centralised place for logging, back stack management and so on, so navigation behaviours are decoupled from the rest of the business logic and not spread around in implementations of different screens.Let’s imagine a situation where we would like to start a screen where the user can select some items from a list of person. You also would like to pass some filtering arguments like age and occupation and gender.
In case of Activities, you would write:
Intent intent = new Intent();
intent.putExtra("age", 40);
intent.putExtra("occupation", "developer");
intent.putExtra("gender", "female");
startActivityForResult(intent, 100);
@Override
protected void onActivityResult(int requestCode, int resultCode, Intent data) {
    super.onActivityResult(requestCode, resultCode, data);
}
Furthermore, wouldn’t it be nicer if the result (list of persons) would arrive in a form of _List_ and not in a serialized form which must be deserialized?
In case of fragment based navigation, everything is more straightforward. All you have to do is to write a method in the NavigationManager called startPersonSelectorFragment() with the necessary arguments and with a callback implementation.
mNavigationManager.startPersonSelectorFragment(40, "developer", "female",
      new PersonSelectorFragment.OnPersonSelectedListener() {
          @Override
          public boolean onPersonsSelected(List<Person> selection) {
       [do something]
              return false;
          }
      });
mNavigationManager.startPersonSelectorFragment(40, "developer", "female", selection -> [do something]);
3. Better means of communication between screens
Between activities, we can share only a Bundle which can hold primitives or serialized data. Now with fragments we can implement a callback pattern where for example, F1 can listen to F2 passing arbitrary objects. Please have a look at the previous examples’ callback implementation, which returns back a _List_.4. Building Fragments are less expensive than building Activities
This becomes obvious when you use a drawer which has for example 5 menu items and on each page the drawer should be displayed again.In case of pure activity navigation, each page should inflate and initialize the drawer, which is of course expensive.
On the diagram below you can see several root fragments (FR*) which are the full screen fragments which can be accessed directly from the drawer, and also the drawer is only accessible when these fragments are displayed. Everything which is to the right of the dashed line in the diagram are there as an example of an arbitrary navigation scheme.
Since the container activity holds the drawer, we have only one drawer instance so at every navigation step where the drawer should be visible you don’t have to inflate and initialize it again. Still not convinced how all of these work? Take a look at my sample application which demonstrates drawer usage.
Cons
My greatest fear had always been that if I used fragment based navigation pattern in a project, somewhere down the road I would encounter an unforeseen problem which would be difficult to solve around the added complexity of fragments, 3rd party libraries and the different OS versions. What if I had to refactor everything I’ve done so far?Indeed, I had to resolve problems with nested fragments, 3rd party libraries which also use fragments such as ShinobiControls, ViewPagers and FragmentStatePagerAdapters.
I must admit that gaining sufficient experience with fragments to be able to solve these problems was a rather long process. But in every case the issue was not that the philosophy is bad, but that I did not understand fragments well enough. Maybe if you understand fragments better than I did you would not even encounter these issues.
The only con that I can mention now is that we can still encounter problems which would not be trivial to solve since there is no mature library out there which showcase all the complex scenarios of a complex application with fragment based navigation.
Conclusion
In this article, we have seen an alternative way to implement navigation in an Android application. We compared it with the traditional navigation philosophy that uses activities and we have seen a few good reasons why it is advantageous to use it over the traditional approach.In case you haven’t already, check out the demo application uploaded to GitHub implementing. Feel free to fork or contribute to it with nicer examples which would better show its usage.


